
| |
Go to the SNMPz home page |
The PDA version of SNMPz is provided as an ipk package to be installed on the PDA in the usual way. In common with many complex packages, it may be necessary to restart the PDA after installation completes to allow the application libraries to be properly recognised.
This package includes the MIB manager and browser applications, supporting desktop entries and libraries and also a default SNMP MIB collection ready to be loaded. No MIB modules are loaded by default, and the MIB manager installs with an empty database.
The MIB manager application can load MIB modules directly from SMI files (extracted from RFCs for example), or it can load SMI files that have been translated to XML format. The SNMPz download site also contains a Java application (smi2xml) that can generate these XML files. Alternatively, XML files exported from MIB Smithy may also be loaded. (Please contact me to let me know if that works.)
After installing the package and restarting the PDA, locate and run the SNMPz MIB Manager application. This will start with an empty database and an empty list of loaded modules. Click on the New icon to bring up the file dialog.
The file dialog shows a list of loadable files in the current location, and a menu allows you to select the current location. If you have transferred files to the PDA, make sure they are in one of the recognised locations for the MIB manager:
Select the file or files to be loaded and then click on OK. A progress dialog will be displayed, and then the main display will show a list of MIB modules loaded from the selected files.
Now exit the MIB manager application and then locate and execute the SNMPz browser. The MIB tab should now contain object registrations from the loaded modules.
In SNMPz, you'll only be able to click on buttons and icons for actions that are currently possible. Before any SNMP reports can be run, there has to be at least one node in the node list. Since nodes must be associated with a profile (to define SNMP and transport parameters), there has to be at least one SNMP profile configured before the first node can be added.
The general sequence of events is:
Some reports require parameters, and you will be prompted for values after you click on the Go button. A default value for these parameters can be set by selecting an object or table in the MIB tree prior to clicking on the Go button.
A node in SNMPz is a networked device that can respond to SNMP protocol requests in the agent role (i.e. acts as an SNMP agent).
Each node is defined by a name, an optional IP address and a profile. If an IP address is not provided, then the browser will consult the host name lookup service (either the hosts file on the PDA, or the DNS.)
The combination of name, IP address and profile has to be unique, so the same node can have several entries in the node list. For example, if a node supports both SNMPv1 and SNMPv2 then a node entry can be created for each, where both use the same host name and/or IP address.
An SNMP profile defines the parameters to be used when sending SNMP requests to a node. The transport parameters relate to the transport of UDP datagram packets to the node, and the SNMP parameters relate to the SNMP PDU format to be used.
Transport parameters:
SNMP Parameters:
SNMPv3 supports the same functions as SNMPv2c, but adds stronger authentication and encryption
A report in SNMPz is a packaged set of SNMP requests. Each report has a name that is shown in the Reports tab of the main browser window. SNMP requests are sent to a device when both a node and a report are selected, and then the Go button is clicked.
Each report is composed of one or more sections, with each section defining a more basic SNMP operation to be performed. The result of performing all of the sections of a report is shown in the Results tab of the main browser window (the Results tab is automatically selected when a report is requested). If there is more than one section, the browser places a movable divider between the sections to allow the user to adjust the relative sizes.
SNMPz reports are defined in report files. Currently, there is a default shared report file in
/opt/Qtopia/etc/SNMPzBrowser/Reports/Reports.xml (Qtopia version)
/opt/SNMPz/SNMPzBrowser/Reports/Reports.xml (desktop version)
~/Applications/SNMPzBrowser/Reports.xml (Qtopia version)
~/.SNMPzBrowser/Reports.xml (desktop version)
Reports directory plus the user report file
are loaded. The default shared report file is part of the SNMPz installation package and will be
removed if SNMPz is uninstalled (or upgraded).
The report file is defined in XML (sorry, no stylesheet, DTD or schema exists yet). Here is an example report file.
A report definition has the following general form:
<report path="root/.../name">
  <sections>
    <section>
      <function name="functionName">
        <parameters>
          <parameter name="parameterName" type="parameterType" [prompt="promptText"]
                        [value="parameterValue"] [defaultValue="defaultValue"]/>
           .
           .
        </parameters>
        ..
      <function>
    </section>
    .
    .
  </sections>
</report>
The path attribute of a report identifies where the report is to be located in the
browser Reports list. A "/" character refers to a sub-tree in the reports
list hierarchy. For example, a path of Generic/Interfaces means there is a top
level item in the reports list called Generic containing a report called
Interfaces. SNMPz allows any number of levels, so you have great flexibility in
organising your reports.
Each report is composed of a list of sections, where each section refers to a function invocation. A function in SNMPz is a basic SNMP request or a predefined combination of SNMP requests. Currently, there are four SNMPz functions:
Each of the function elements can contain an element giving function parameters. The function
descriptions below specify the parameters of the function. If a required parameter does not
specify a value, SNMPz will prompt for a value. The prompt uses the values of the "prompt"
and "defaultValue" attributes.
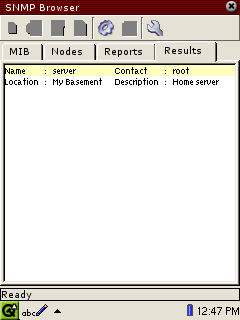
Group functionThis function identifiers a set of MIB object instances to be retrieved from the current node and displayed as a group.
<function name="Group">
  <entries>
    <entry name="entryName" object="objectInstance"/>
    .
    .
  </entries>
</function>
The entry name is a label that will be shown with the object value, and the
objectInstance is the (preferably) fully-qualified object identifier (an SNMP
get request will be based on this). A fully-qualified object identifier is either
a numeric string such as 1.3.6.1.2.1.9.0 or an object name preceded by its module
name and followed by instance identifiers, as in
IF-MIB.ifDescr.0
An example of the result of a group function. The result is organised in
columns and aligned by the ":" used to associate name and value pairs. The number of
columns per row and the appearance of scrollbars are decided automatically.
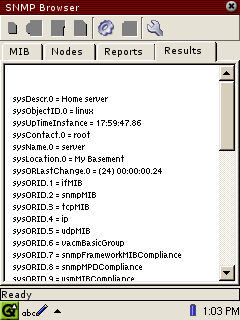
Walk functionThis function performs a regenerating SNMP get-next series starting with a specified place in the registration tree. The series ends when either the end of the MIB view is reached, or an object instance is returned that is outside the registration sub-tree headed by the starting point.
<function name="Walk"/>
  <parameters>
    <parameter name="walkStart" .../>
  </parameters>
The value of the "walkStart" attribute is the starting point for the walk, and is either
a numeric string or a (preferably) fully-qualified name. Note that the starting point does not
have to refer to an existing object instance or to a point in the registration tree that is known
to the target node.
An example of the result of a walk function. To save space, SNMPz does not display module names in OID values (this may become configurable later).
TableWalk functionThis function retrieves rows of a (conceptual) table. There are two forms for this function; in the
first form, a parameter gives the name of the table to be retrieved and all other
information is inferred from the MIB definition of the table. In the second form, the report
definition provides the list of columns, the column headings, the choice of a control
column, the ordering of columns in the report, and the ability to omit uninteresting columns.
If a parameter named "table" is present in the parameters element, its
"value" attribute (or, alternately, a value supplied in response to the prompt that is
issued when the "value" attribute is not present) names the table to be retrieved. All
columns of the table are retrieved, and the first accessible column is used as the control column
(to generate index values). Column headings are based on the names of the column objects.
<function name="TableGroup">
  <parameters>
    <parameter name="table" .../>
  </parameters>
</function>
If a columns element is present (instead of a parameter giving a table name)
then it defines the names of the columns to be retrieved and the column headings to be used for
display purposes. The columns do not all have to be defined in the same table, so long as they share
an indentically-valued index.
<function name="TableGroup">
  <columns>
    <column name="columnName" object="objectName" type="columnType"/>
    .
    .
  </columns>
</function>
columnName is the heading that will be used for a column. objectName
is either a numeric string or (preferably) a fully-qualified object name. The
columnType is one of the following:
normal - The column is a non-index (and readable) column of its tablecontrol - The column is a non-index (and readable) column of its table, and
should be used to generate index values for this function.implicit - Values for the column can be inferred from control
column instances (use this for columns that are non-readable indexes of their table).If no type attribute is present, it defaults to normal.
Object names in implicit columns should normally use an unqualified object name (since the
value is determined from another column which is not necessarily in the same table or module).
The control column should be chosen based on the desired set of rows. For example, suppose the
ifTable is a base table, and a media-specific table is an extension of the base table.
If you want to select just the rows that appear in the extension table then the control column should
be one of the extension table columns. If the table is 'sparse', then using a different control column in
the table will select a different set of output rows, based on the instances of that column.
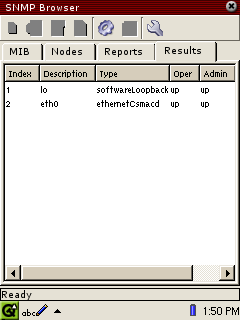
An example of the result of a table walk function for the
ifTable. In this example, the Oper column is the control column (using
IF-MIB.ifOperStatus to produce index values) and the Index column is
implicit (based on ifIndex, which is an index of ifTable)
In the current release of SNMPz, the table walk algorithm will discard any retrieved values that are not on the same row as the retrieved control column instance, which means it is not as efficient as it could be for sparse columns. A later release will correct this deficiency.
Graph functionThis function plots periodically sampled values of object instances on a moving strip chart. Each object object trace is shown in a different colour, and the graph auto-scales so that the highest and lowest values are always visible.
<function name="Graph">
  <parameters>
    <parameter name="shiftTime" .../>
  </parameters>
  <entries>
    <entry name="label" object="objectInstance" [sample="sampleTime"]/>
    .
    .
  </entries>
</function>
The value of the shiftTime parameter gives the shift (scroll) time (in milliseconds) for the
graph. If the parameter is omitted, the shift time is taken from the most-frequently sampled object
instance.
Each entry specifies an object instance to be sampled and a label for it on the graph. If
a sample attribute is present, it gives the time (in milliseconds) between samples,
defaulting to 1000 (1 second).
If a Counter value is sampled, the graph will plot the difference between consecutive
samples rather than the absolute sample value (a Counter by definition must be always increasing in
value, and has no defined starting value.)